You’ve probably heard that an advertisement’s role is to sell the click.
However, the fact is that what happens after the click is far more valuable than the click itself.
After all, you don’t really want users to click your ads…
You want users to click these ads, and then take action – whether that’s in the form of a purchase, a lead, or any other valuable action.
And this is where conversion tracking becomes crucial for advertisers. Whether you’re on Google, Facebook, or any other ad platform, it is essential to understand what happens after the click so you can optimize your campaigns for the most valuable results.
In this article, we’ll walk you through everything you need to understand everything about conversion tracking on Google Ads.
The Basics: Tags & Conversions
Before we get started, it’s important to understand the differences between these two concepts: tags, and conversions.
A conversion is a valuable action a user takes on your website, such as a lead, a purchase, or an app download.
In other words, it’s an action that is directly tied to your business goals.
On the other hand, tags are tiny bits of code that you install on your website that let Google know whenever one of those conversions has occurred.
Don’t worry if you’re not code-savvy.
How to Track Conversions on Google Ads
In this article we’ll cover two different methods to track Google Ads conversions on your website.
- Google Tag Manager: this is the recommended but also the most advanced method to do it. However, you need to have some basic know-how with this tool. If you’re not familiar with Google Tag Manager, we recommend you either read our Google Tag Manager tutorial or skip to option #2.
- Google Analytics Import: with this method, we’ll create a conversion on Google Analytics, link Google Ads with the Google Analytics account, and import the conversion.
With that said, let’s dive into method number one.
Google Tag Manager
To track conversions with Google Tag Manager you’ll first need to create a conversion on Google Ads and then install the provided code snippet on your website.
As we mentioned, this method requires some experience with Google Tag Manager but is definitely the best method out of the two.
Here’s how you can do this.
Create a Conversion
To create a Google Ads conversion, access the main menu and, under “Measurement“, click on “Conversions“.

Then, click on the blue “+” circle icon near the left sidebar, as shown in the image below.

The next screen is where we’ll select our conversion settings, which will define which user action this conversion stands for.
Conversion Settings
Each conversion stands for one valuable action users can take on your website.
If you want to track different actions, such as an Add to Cart, Checkout, or Purchase, you’ll need to create one conversion for each action.
So let’s get started.
To start, select the “Website” option, to the left of the screen.

In the next screen, you’ll have to select the action you’d like to track, add a name, and a few other options.

- Category: in this case, we’ll create a conversion to track purchases, so we’ll select the “Purchase” category.
- Conversion Name: select an accurate name that makes it easy for anyone accessing the account to quickly understand what the conversion stands for.
- Value: this is the monetary value of the conversion. If in your case, the product costs $19.99 (or any other value), you’ll select the “use the same value for each conversion” option and type in that same value.
- Count: there are cases where it makes sense not to track repeat conversions, such as webinar sign-ups. In this case, we want to track all purchases that happen, so we’ll select “Every“.
In the final section of this window, you’ll have to select the conversion window and attribution model for this conversion.
For now, leave the default options enabled and we’ll come back to this later.
For now, click on the “Next” button.
Install the Google Ads Tag
Now that you’ve created your conversion, you’ll have to locate the code (or tag) and install it on your website.
Select the “Use Google Tag Manager” option.

If you didn’t read the whole post up to this point and if you’re not familiar with Google Tag Manager, we recommend you either read our Google Tag Manager Tutorial or skip straight to the “Import” section.
On the next screen, you should be able to locate the “Conversion ID” and the “Conversion Label” fields. Save them, as you’ll need to use them in a minute.

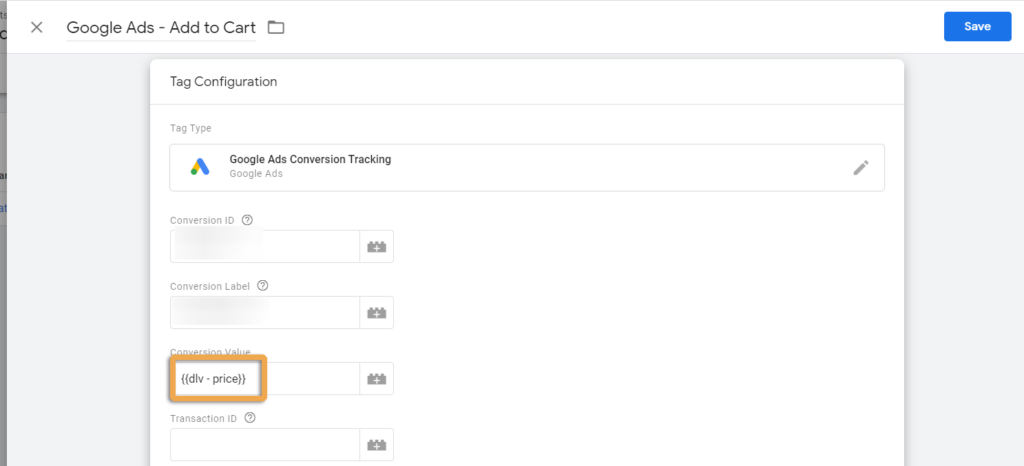
Head on over to Google Tag Manager and, under the “Tags” section, click on “New“.

Then, name your tag and click on the “Tag Configuration” section.

Selec the “Google Ads Conversion Tracking” option…

… and paste the “Conversion ID” and “Conversion Label” values into their respective fields. Then, click on “Save“.

To finish the installation, add a trigger that fires whenever a user completes a purchase and hit “Save“.
That’s it!
You have created and installed a Google Ads conversion. We’ll discuss how to make sure the installation was successful in a minute.
Install With Google Analytics
As an alternative, you can also import Google Analytics goals and eCommerce transactions into Google Ads.
To do so, you’ll first need to make sure your Analytics and Google Ads accounts are linked. Only once this connection is done will you be able to import your goals into Google Ads.
Link Google Analytics & Google Ads
To link the accounts, access the “Admin” section on Google Analytics and, under “Product Linking” in the “Property” tab, click on “Google Ads Linking“.

Follow the on-screen instructions and connect Google Analytics to your Google Ads account. Make sure the Google Ads account ID is the correct one before you proceed.

Import Google Analytics Goals
Once you’ve connected both accounts, access your Google Ads account, create a new conversion, and select the “Import” option in the first screen, and then select “Google Analytics“.

Then, select the goals or transactions you wish to import from Google Analytics, and click “Import and Continue“.
In this case, we’ll select our “Lead” conversion.

All done!
How to Verify Installation
Now that you’re able to track conversions on your website, whether that’s via Google Analytics or via Google Ads Tags, you’ll need to first ensure that these conversions were installed correctly.
Here’s how can you make sure, depending on the method you’ve chosen.
Google Ads Tag
If you went with the Google Tag Manager option, you’ll need to install the Google Tag Assistant Chrome extension to validate if the tags are being triggered correctly.
Once you’ve installed the extension, you should see a new icon next to your browser’s search bar.

Open a new tab in your browser and navigate to your website. Then, click on the extension, hit the “Enable” button, and refresh the browser.
Once that’s done, simulate a conversion and check the tags that fired within the extension. If you see the Google Ads Conversion Tracking Tag fired, then it was successfully installed.
Otherwise, there’s an issue with the installation.
Google Analytics
Sign in to Google Analytics and access the “Real-Time Reports” in the left sidebar, and then click on the “Conversions” tab.
You should then see the conversion listed in the menu.
To ensure this conversion fires correctly, run a test conversion. The “Active Users” number should turn to “1”.

If it did, success!
The Difference Between Google Ads & Google Analytics
If you’ve read both methods and are unsure about which one to use, let us discuss the differences between each one.
As we’ve mentioned, our preference goes to using the Google Ads Tag.
This is because there are differences in how each platform tracks conversions, which means results will often be different between the two.
We won’t cover all the reasons why in this article, but we’ll discuss at least two of the main differences between them.
- Attribution Models: Google Ads and Google Analytics use different attribution models. With Google Analytics, if a user clicks an ad but doesn’t convert, but later returns to the website via Organic Search (or any other channel) and converts, Google Analytics will attribute that conversion to Organic Search. In other words, Google Ads won’t count a conversion, even if the click (obviously) contributed to the sale. If you were using a Google Ads Tag though, Google Ads would still track the conversion.
- Attribution Time: Google Analytics counts a conversion on the day it actually happens. On the other hand, Google Ads counts the conversion on the day where the click occured. This enables you to better understand how long each user takes between the click, and the conversion, which allows for better campaign optimization.
With that said, which method should you use?
The short answer: both.
However, to use both we’ll need to head back to the “Conversion Settings” menu for a small tweak.
For more information on the differences between Google Analytics and Google Ads conversion tracking, see this video from Measure School.
Conversion Windows & Attribution Models
To use both the Google Analytics and Google Ads tag, you’ll need to make a small change to the Google Analytics conversion.
The reason for that is if you choose to use both methods, you’ll end up with twice the recorded conversions. In other words, whenever there’s a conversion, both Google Analytics and Google Ads will record this conversion, which will result in duplicated conversions.
Luckily, it is simple to fix this.
In the “Conversions” section, select the Google Analytics conversion and click on “Edit“.
Scroll down to the bottom of the screen and look for the “Include in “Conversions”” option.

Then, click on the checkbox so the conversion isn’t included in the “Conversions” column.

What this will do is “tell” Google that this conversion shouldn’t be included in the “Conversions” column in the ads dashboard.

In other words, you won’t count twice the conversions.
But why should you go through all this trouble? Couldn’t you just not import Google Analytics conversions?
You could. But as we mentioned before, Google Analytics and Google Ads use different attribution models and, if your product or service has a longer conversion window, chances are different channels will be involved.
By comparing both the Google Ads and Google Analytics conversions, you can paint a better picture of your customer’s journey and make better decisions about your campaigns.
Track Micro-Conversions with Custom Columns
You have now created and installed the conversions to be included in the “Conversions” column.
But what about other smaller micro-conversions, such as an add to cart? Should these be included in the “Conversions” column as well?
That’s a good question.
And the answer is… no, you shouldn’t include them.
Yet, this doesn’t mean you shouldn’t create them either.
To track these conversions, create and install the conversion code for each of these actions and disable the “Include in Conversions” column.
However, these results won’t be available within the ads interface… at least, not without (another) small tweak.
Once installed, create a custom column in the ads interface. To do so, click on “Modify Columns” in your Google Ads dashboard.

Then, scroll down to the bottom of the screen and click on the “Custom Columns” button.
To finish, select the “All Conv.” metric and add a segment with the “Conversion Action” to include the desired conversion, as in the image below.

Hit “Save“, and include this metric in your columns.
You can repeat the same process for any other conversion you want to track.
How to Track Dynamic Transaction Values in Google Ads
“But what if I want to track different conversion values, such as if a user purchases multiple products?”, you ask.
Yet another great question!
To do this, you’ll need to pull dynamic values into the “Conversion Value” field in Google Tag Manager, with the assistance of variables.
We have written an entire article on how to use Google Tag Manager variables to answer this question.
If you have never used Google Tag Manager, we recommend you read our two introductory posts on this tool.
Closing Thoughts
The better a marketer can understand the different actions a user takes before a final conversion, the easier it is to drive better results.
As such, understanding how to correctly track and measure conversions within Google Ads is an important skill for anyone who invests on paid media.
Sure, you can also ask a developer to do these things – but this often comes with a cost that can easily be avoided with a little research.
How did your conversion tracking implementation go? Did you have any trouble with it?
Leave us a message on the comment section below

