Google Analytics has been the default measurement software for more than half of the world’s most visited websites, according to recent studies.
That’s over 25 billion websites, if you were wondering.
advertisement
Peter Sondergaard even stated that “Information is the oil of the 21st century, and analytics is the combustion engine.” – so those numbers aren’t surprising.
The best of it all? Google Analytics is 100% free.
In this article we’ll cover how to install Google Analytics with one of our favorite tools: Google Tag Manager.
If you’re not familiar with Google Tag Manager, we recommend you read these two articles first.
Ready?
Why You Need Google Analytics
With dozens of built-in reports, Google Analytics gives you the ability to truly know and understand your customers.
- How Users Find Your Website: see which channels drive the most valuable users to your website, and how they find you.
- Your Most Valuable Pages: which pages are driving the most revenue for your business? Which ones need to be improved?
- Measure Conversions: how many users have filled out a form? Or completed a purchase?
- How Users Navigate Your Website: understand how users move through your website. From the entrance page to the pages they visited before converting, it’s important to understand which areas can be improved.
There are countless other reasons to use Google Analytics but we’ll leave those for another post.
Before You Proceed
As of the 14th of October 2020, Google has officially made Google Analytics 4 the default property type for new accounts, and will eventually replace Google’s current version of Universal Analytics.
However, you can still use the older version. In fact, Google itself still recommends users to run both Universal Analytics and GA4 in parallel. In other words, this means that you’ll need to install two different versions of Google Analytics.
As such, we’ll cover the installation process for these two property types: Universal Analytics and Google Analytics 4.
As to which one you should use more often, we’ll leave it up to you. In any case, we believe Google Analytics 4 is still in a very early-stage, for which reason we’ll stick to Universal Analytics, at least while we get familiar with it.
For more information on the differences between these two versions, we recommend Ken Williams’ website.
If none of that has scared you away, let’s jump in.
Getting Started With Google Analytics
The installation process shouldn’t take more than 10 minutes but before we can start, there are some things you’ll need.
To install Google Analytics 4 or Universal Analytics, you’ll need to:
- Create a Google Analytics Account: accounts are your access point to Google Analytics. Each account can contain different properties, depending on how many websites or applications you want to track.
- Create Your Properties: a property is a website, mobile application, or device. In the older version of Google Analytics (Universal), properties could only collect data from websites. The new Google Analytics 4 can collect data from websites and mobile applications.
- Create Your Data Stream (GA4 only): a data stream is a data source – and each property can contain different data sources. For instance, you can connect a website and an app (two data streams) within the same property.
- Install Google Analytics: once the steps above are completed, you’ll need to add a bit of code to your website to complete the installation.
For more information on account hierarchy, we recommend you read this post.
Create Your Google Analytics Account
To create an account, head on over to Google Analytics and click on the “Start For Free” button.

To set up your account, the first thing you will need to input is your Account Name.

Next, review the “Account Data Sharing Settings”. This segment lets you control how much of your data you’re willing to share with other Google applications.

Create Your Google Analytics Properties
To create a Google Analytics 4 property, you can type in your website name, select the reporting time zone, and currency – and then click on the “Show Advanced Options” button to create a Universal Analytics property, too.

In the advanced options menu, enable the “Create a Universal Analytics Property” feature and fill in the website URL field.

You’ve just created two different properties within one Google Analytics account: one Google Analytics 4 property, and one Universal Analytics property.
To finish, fill in the details in the “Business Information” tab and hit “Create”.

Once that’s done, read and accept Google’s Terms of Service Agreement. You’re almost there!
Create Your Data Stream
As mentioned in the introduction of this article, Google Analytics 4 properties use data streams **to collect data from websites, and mobile apps.
To create a data stream and connect your website to Google Analytics, select “Web”.

Once you’ve clicked on the “Web” option, type in your website’s URL and name in the respective fields, and click on “Create Stream”.

How to Install Google Analytics
Now that the data stream has been created, you’ll need to install it on your website in order to collect data.
Luckily, Google has made it very easy to install Google Analytics with Google Tag Manager. Here’s what you’ll need to do.
advertisement
Google Analytics 4
To connect a Google Analytics 4 data stream to your website via Google Tag Manager, you’ll need to locate the measurement ID. You’ll use the it later within Google Tag Manager.
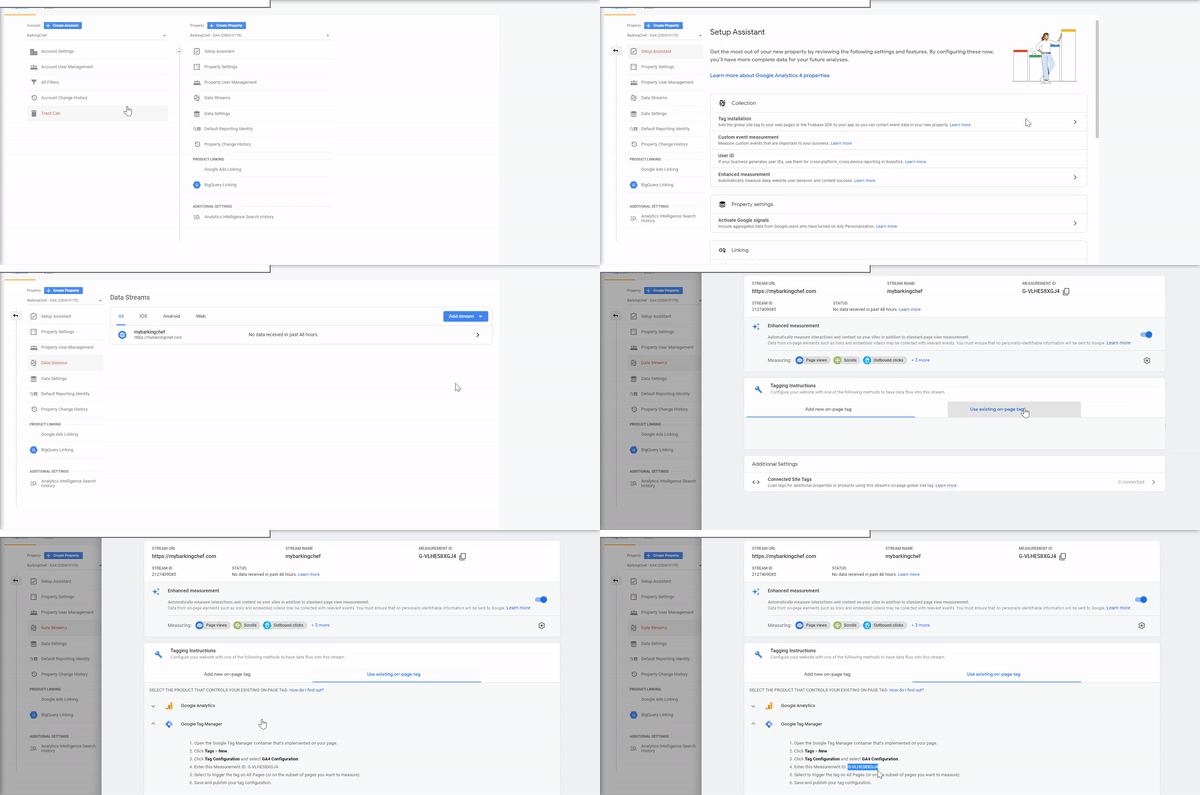
To access this measurement ID, as soon as the data stream was created, the “Web Stream Details” window should’ve opened.
In the “Tagging Instructions” section, click on “Use Exiting On-Page Tag”.

Then, locate the measurement ID in the on-screen instructions, as in the image below.

You can also access the measurement ID in the “Setup Assistant” within the admin section, as shown in the video below.

To install Google Analytics, head on over to Google Tag Manager and click on the “New Tag” button.

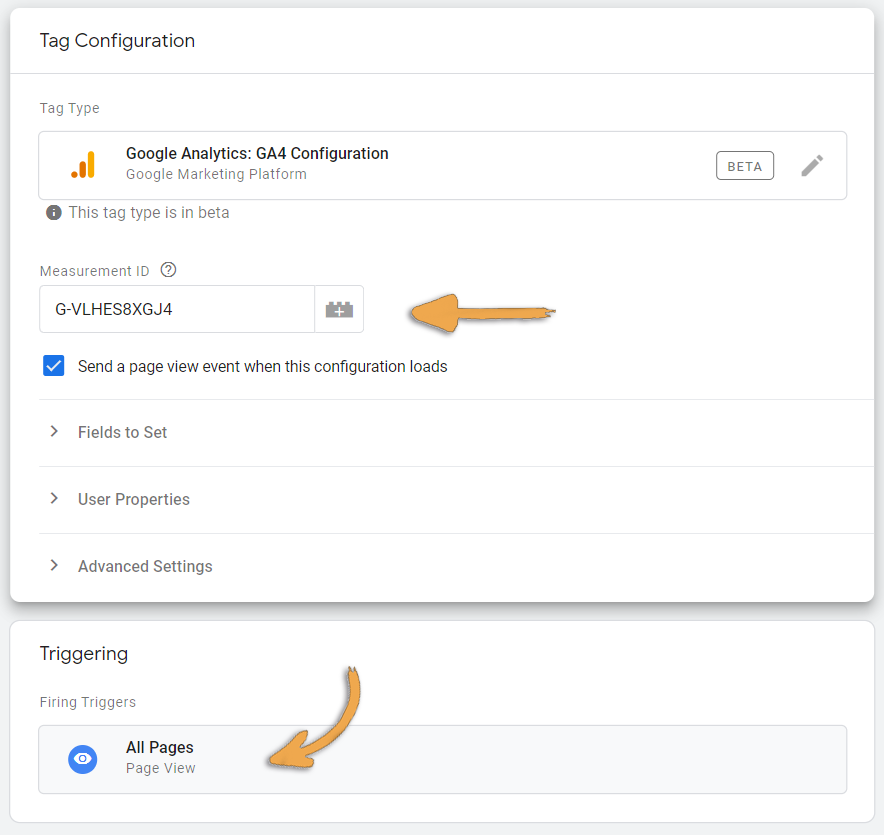
Click on the “Tag Configuration” section and select the “Google Analytics: GA4 Configuration” option, in the right sidebar.

Paste the measurement ID in the correct field, and add an “All Pages” trigger.

Click save. You’re done!
Universal Analytics
To install the older version of Google Analytics on your website, you’ll need to locate the tracking ID and paste it into Google Tag Manager. The process is identical to the one for Google Analytics 4.
Access your Google Analytics’ account admin section and, under the “+Create Property” button, click on the small arrow drop-down.
Then, locate the Google Analytics property for Universal Analytics. You can identify this property via the “UA-XXXXXXXX-X” identifier.

In fact, this is the tracking ID you’ll need to install Google Analytics via Google Tag Manager. You could also access this code under the “Tracking Info” section, as in the image below.

Once you’ve located the tracking ID, head on over to Google Tag Manager and create a new tag.

Select the “Google Analytics: Universal Analytics” option, and paste the ID in the correct field. Add an “All Pages” trigger, and hit save.

Once you’re done, click on the “Submit” button on Google Tag Manager.

You’re all set!
How to Check if Google Analytics is Working
Once you’ve completed all the steps above, you’ll want to make sure the installation was successful.
To do so, you can use Google Analytics’ real-time reports. Here’s how you can do that.
Google Analytics Real-Time Reports
Google Analytics has a built-in report that allows you to track users in real-time on your website. This is a useful feature to ensure the installation has been successful.
To access this report, in Google Analytics’ sidebar menu to the left, click on “Overview” under “Real-Time”, as in the image below.

Once you’ve accessed this report, open your website in an incognito browser. If you see user activity in the report, the installation was successful.
The real-time report is available both in Google Analytics 4 and Universal Analytics. You’ll need to check on both properties to ensure a correct installation.
advertisement
What’s Next?
With the most recent introduction of Google Analytics 4 properties, we can expect a lot of changes in the next year.
In fact, Google Analytics 4 shouldn’t be considered as a new version of Google Analytics, but rather an entirely different product. In the meantime, we recommend users to use both while Google rolls out its newest features for GA4.
We hope that this article has made it clear and easy for you to install Google Analytics.
If you had any trouble with the installation, feel free to reach out to us via DM on Twitter, or shoot us an email at info@theconversionlift.com
Don’t forget to subscribe to our newsletter for the latest trends and guides on digital marketing!


2 comments
Hi Alex,
Great article for getting started with GA4.
Just to add to your guide, I wrote an article on how IP address filters can be set up in GA4.
I believe this is a key part of GA4 set up so you can keep your data clean.
Here it is: https://witneyseoguy.co.uk/blog/set-up-ip-address-filters-in-google-analytics-4/
Let me know your thoughts.
Cheers,
Matt
bookmarked!!, I love your site!