
Google Shopping Ads are one of the most lucrative and effective campaign types available for online retailers and eCommerce business owners.
Fueled by the 2020 coronavirus pandemic, online shopping has recorded an all-time high with Google Shopping placed dead-center in front of the action with a reported 110% increase in impressions and a +70% increase in clicks during lockdowns. (source)
Even before these uncertain times, Google Shopping Ads already accounted for more than 70% of retail search ad spend, and more than 80% of all clicks. (source)
And the odds are, these trends are here to stay.
In this Google Shopping Ads guide, we’ll share everything you need to know about Google Shopping and how you can create your first campaign, too.
Ready?
What Are Google Shopping Ads?
Formerly known as Product Listing Ads, Google Shopping Ads are a powerful way to showcase products to customers directly within Google’s Search Results Page.
In contrast to regular Search Ads, Google Shopping Ads also include an image of the product, as well as other relevant attributes such as the products’ name, version, color, price, and more. These attributes make it easier for customers to compare products, and find the best match for their needs.

These ads also have the added benefit of showing up above regular paid search ads, and organic results, as well as showing the most relevant products for a users’ search query.

How Do Google Shopping Ads Work?
While Google Search Ads use keywords to match a users’ search query with a relevant ad, Google Shopping Ads use “Product Feeds” to match products to relevant search queries.
For example, when a user searches for “Men’s Running Shoes“, Google will search for products within a product feed that contain the words “Men’s Running Shoes“, or that at least closely matches that users’ intent, and showcase an ad with that product.
These ads are automatically created by Google using the information contained in the product feed, such as the products’ image, price, title, or description.
We’ll talk more about how to create these product feeds in a minute.
Google Shopping Ads Formats
There are three main different Google Shopping Ads formats.
- Product Shopping Ads: created based on the data submitted to your product feed, and are used to advertise individual items above the search ads results (as shown in the previous images).
- Showcase Shopping Ads: these ads can advertise several different products at the same time, and are better suited for earlier stages in the consideration funnel.
- Local Inventory Ads: these ads allow you to showcase products and store information to nearby customers searching within Google. Ideal for merchants with brick-and-mortar stores.
In this article, we’ll focus on Product Shopping Ads since they’re most often our best performers and the most common format in Google Shopping.
Getting Started with Google Shopping
To launch Google Shopping campaigns you’ll need to first create a Google Merchant Center account, and then create the Product Feed which will hold the data for all of your products.
Once this is done, you’ll have to link your Google Merchant Center account to your Google Ads account, and only then will you be able to launch your campaigns.
In the next sections of this article we’ll walk you over each one of these steps so you can get started with Google Shopping Ads.
Let’s get to it.
The Google Merchant Center
The Google Merchant Center is the database where your product feed will be hosted. In contrast, the product feed is the file that holds the data from each of your products’ attributes.
Other than “hosting” your product feed, the Google Merchant Center has some other useful features that allow you to customize your product feeds, compare your results with competitors, and more.
First, let’s create our Google Merchant Center account.
1. Create Your Google Merchant Center Account
To create a Google Merchant Center account, head over to the official website and click on the “Get Started” button.

Then, scroll down and enter your business information, accept the terms and conditions, and hit “Create Account“.

2. Verify & Claim Your Account
To claim your account, you’ll need to “prove” to Google that you actually own the website you want to run ads to. Google offers three different methods to do so.
However, if you have Google Analytics installed, this should be the easiest option out of the three. Any other alternative is fine, though.

Once the website is verified, hit the “Claim” button to claim ownership of the website.
3. Configure Your Tax & Shipping Settings
You will also want to add information about taxes and shipping to the account.
This information is important for Google to understand and compare the different prices for your products, depending on the region your products are sold, and your ads are seen. For example, you can add shipping regions if you only sell to a specific location, or different courier costs for each delivery location.
You can also add this information directly in your product feed, but we recommend you add them here.

We won’t tell you how to fill in this information since this is unique to each business. However, it is a relatively simple process and it shouldn’t take you more than 5 minutes as you follow the instructions.
4. Link Google Ads Account
Last but not least, you’ll want to link the Google Merchant Center account to your Google Ads Account. You won’t be able to run Google Shopping Ads otherwise.
In the main menu ribbon, under the “Settings” menu, click on “Linked Accounts“.

If you already have a Google Ads account created under the same Gmail address, you should see the account’s ID in the dashboard. Click on the “Link” button, and that’s all that’s needed.

Now all that’s left is to create the “Product Feed“, so you can run some Google Shopping Ads campaigns.
What Are Product Feeds?
In a few words, a “Product Feed” is a file that contains a list of the products you want to advertise, and the attributes of each one of those products. In other words, it’s a list that organizes your product catalog in a way that Google can read, and understand.

For example, in the image above we can see that each of the spreadsheet’s lines contains a different product, and each column contains a different attribute for each one of those products.
Why Do Product Feeds Matter?
Product feeds are arguably the most important element in your Google Shopping Ads campaigns.
You see, as we’ve mentioned earlier, Google Shopping Ads do not use keywords to match ads to a user’s search query. Instead, Google will use the information it can find about a product within a product feed, to show an ad that matches a user’s search query.
This means that how a product title is written in itself can (and will) have a direct impact in which search terms trigger your ads, and that’s why product feed optimization is one of the single most important aspects of Google Shopping Ads campaign management, and optimization.
In the final chapters of this guide, we’ll teach you exactly how to optimize your feeds, with some examples.
How to Create Your Product Feed
Now that we understand the importance of the product feed, and that we have our Google Merchant Center Account created, it’s time to create our first product feed.
To do so, in the left navigation menu, click on “Products“, and then “Feeds“.

Now, there are two different types of feeds you can create: primary feeds, and supplemental feeds.
- Primary Feed: this is the main file that will contain the information about your products, and product attributes.
- Supplemental Feed (optional): this is a secondary feed that can be used to add additional attributes to each product, without editing the main feed.
To create a primary feed, click on the blue “+” icon near the top left. In the next screen, you’ll see there are a few different methods to create a product feed.
We’ve listed three of them, from beginner to advanced, so you can choose whatever works best for you. Feel free to skip the rest.
1. Google Spreadsheets (Beginner)
One of the easiest and fastest ways to upload product data into Google’s Merchant Center is to use Google Sheets. If you’re new to Google Shopping, this should be your default choice.
In short, you’ll create a Google Sheet and include information about your products’ different attributes in different columns, and send this information to the Google Merchant Center, as in the example below.

The main benefit of using Google Sheets is its’ ease of use, and customization, since most edits can be done in a spreadsheet. On the other hand, this also means it can become hard to manage feeds with a lot of product variants, and constant updates.
Furthermore, Google Spreadsheets have a few other limitations. For example, if a product runs out of stock, you’ll need to manually edit the feed to update this information.
For these reasons, we recommend this method if you have a small number of products you wish to advertise and/or are just getting started with Google Shopping Ads for the first time.
1.1 How to Create Google Sheets Product Feeds
To create a product feed with Google Sheets, select the “Google Sheets” option and name your product feed.

You can then choose to either “Create a new Google Spreadsheet from a template“, or “Select an exisiting Google Spreadsheet“, in case you’ve already created one before.
Note that the feed should be created in accordance to Google’s product data specifications, and include all mandatory attributes. If you select the first option, the template will include the mandatory fields that need to be included in the feed.

You will also want to create an upload schedule so that Google can look for changes in the spreadsheet on a regular basis. You should choose at least a weekly fetch schedule.
Products can also expire after 30 days if not updated regularly, which makes the scheduled data fetch even more important.
2. Scheduled Fetch (Intermediate)
Scheduled fetches allow you to link a file hosted on your website to the Google Merchant Center.
This file, most often an XML type file, differs from a Google Spreadsheet in that since this file is linked to and hosted on your website, your products are automatically updated in (almost) real-time and the file doesn’t need as much maintenance work as Google Spreadsheet does.
Here’s what one of these feeds look like.

One of the main advantages of this method is that, for example, if a product goes out of stock and should no longer be advertised, the feed will automatically update and keep you from advertising these products, possibily saving you a lot of money.
Now, while this is a more “hands-free” approach, it does require a stronger technical background to set up, and may not be as suited for beginners as the previous method.
2.1 How to Create an XML Data Feed File
As we’ve mentioned, the downside of XML data feed files is that they might require the assistance of a developer to create. However, if you’re on WordPress or Shopify, there’s a ton of cheap plugins and apps that can do this for you.
Here are two examples.
- WordPress: Product Feed Pro for WooCommerce
- Shopify: Feeds For Google Shopping
We won’t cover how to use each of these plugins/apps, as it depends on the one you’ll use. However, these are relatively easy to use and have instructions so that you can create your feed easily.
2.2 Link Your File to Google Merchant Center
Once you’ve created your XML data feed, you’ll need to link it to Google Merchant Center. By now, you should have an XML feed created and hosted on your website, and a URL such as “www.yourwebsite.com/product-feed.xml.“
You’ll need to take that URL and use it to create your feed. To do so, select the “Scheduled Fetch” option.

Take that URL and enter it into the “File URL” field.

You should also set a fetch frequency on a daily basis, so that products are continuously updated as you add or remove products, or products run out of stock.
That should do it!
3. Product Feed Management Tools (Advanced)
The last and most advanced method is to use dedicated Product Feed Management Tools.
Now, Product Feed Management Tools are better suited for more advanced advertisers, due to their costs and learning curve. There are a few reasons that should make you consider these tools, as you become familiar with Google Shopping Ads.
- Customizable: these tools make it easy to quickly customize and optimize your product titles, descriptions, images, and other attributes.
- Cross-Platforms: if you want to run Shopping campaigns on Bing or Facebook, for example, you’ll need different feeds that are built specifically for each channel. These tools can easily adapt your feed for other channels.
- Troubleshooting: discover and fix errors in the Google Merchant Center with the assistance of these tools.
- Support: most tools come with dedicated support teams that will help you get your product feeds set up in no time.
3.1 Best Product Feed Management Tools
If you’ve chosen to use this method to create your feeds, here are some great options we can vouch for.
There are plenty of other alternatives, so feel free to try a few of them. Now that all that’s out of the way, let’s get into actually creating our Google Shopping Ads campaigns!
Quick Introduction to Google Shopping Campaign Structure
Before we move on to the campaign settings, let’s take a quick break and look at how Google Shopping campaigns are structured.
As we’ve mentioned earlier, Google Shopping Ads do not use keywords to trigger ads. Instead, we use “Product Groups” to tell Google which products in our feeds we want to advertise. We can then further refine which products we want to advertise, under a certain product group.
Product groups can be created based on the different attributes that were created in your feed, such as the product type, category, and other attributes. See why product feeds are so important, now?
For example, let’s suppose we want to run ads for our Barbecue store and promote our different varieties of Barbecue Grills. Here’s one way we could structure our campaign.
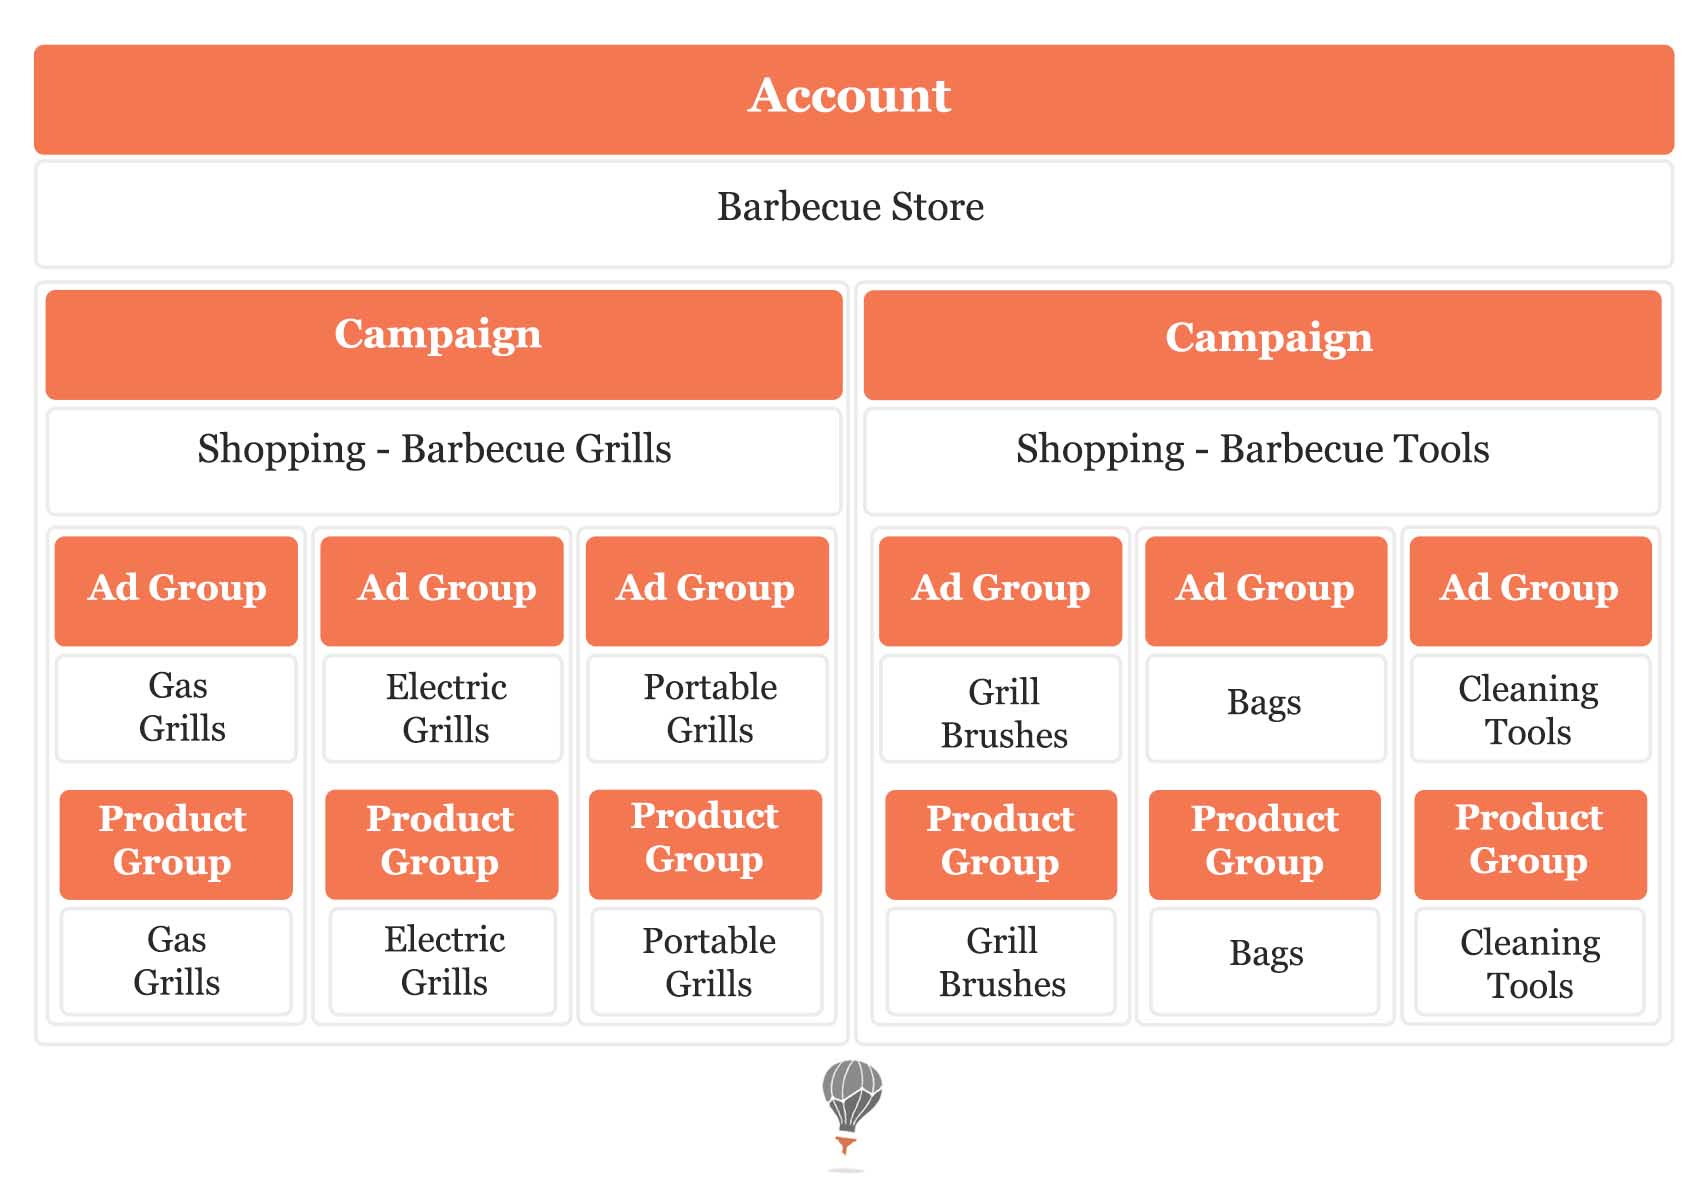
This would allow us to bid differently on each Barbecue Grill type, and even on different individual products, based on their performance.
In the next sections, we’ll break down exactly how to do this so you can create your Google Shopping campaign, too.
How To Create Google Shopping Ads Campaigns
Now that your product feed has been created, all that’s left is to create your Google Shopping Ads campaign.
To do so, head over to the main Google Ads dashboard and click on the “+” icon to create a new campaign. Then, select the “Shopping” campaign type.

Then, select your Google Merchant Center Account and make sure to select the “Standard Shopping Campaign” option, and not the “Smart Shopping Campaign“.

These are two different campaign types, which we’ll discuss in another post.
1. Bid Strategies & Budget
If you’re new to Google Shopping Ads, we recommend that you start out with “Manual CPC” until the campaign has a decent conversion volume to move into automated bidding strategies.

Then, select your campaign budget to tell Google how much you want to spend each day.
2. Campaign Priorities
In a few words, when you have the same product in different shopping campaigns, campaign priorities determine which campaign should enter an auction.
But why would we have the same product in different campaigns?
For example, let’s say you’re running a summer sale to promote your portable grills. In this case, you could have the same grills in two different campaigns: “Summer Sale“, and “Barbecue Grills“.
You could then use campaign priorities to tell Google that the “Summer Sale” campaign should take precedence over the “Barbecue Grills” campaign. Note that you should only use campaign priorities if you have more than one Google Shopping campaign, since they’re redundant otherwise.
There are far better uses for campaign priorities than the example above, but we’ll save those for later since they’re a little more advanced. For now, select the default option “Low“.
3. Campaign Targeting
In the networks tab, disable the checkboxes for “Google Search Partners”, and for “Youtube, Gmail, and Discover”.

From our experience, these two networks often result in a higher impression volume but lower conversion rates. Then, select the locations you want to target and click “Save and Continue“.
4. Create Your Ad Group
This is where you’ll choose from the different ad formats available for Google Shopping Ads. In most cases, you’ll stick to “Product Shopping“. This is the most common ad type used by advertisers, and the one that works best for us, too.

As for the bid, we recommend setting a small bid and then adjust based on the results once you’ve collected some data. Then, click “Save“.
5. Add Your Product Groups
As we’ve mentioned earlier in this article, each ad group should contain a different product group.
There are different ways to segment out your different product groups, but these all boil down to how your Product Feed is built. To do so, click on the “+” icon next to “All Products“.

In this case, we’ll subdivide our products by “Product Type“, and then “Portable Grills“.

By doing so, this ad group will effectively be targeting the keywords that Google finds relevant, according to the data you provided in the product feed.
You can go a little bit further and target only specific products within the “Portable Grills” category. For example, let’s say we wanted to subdivide Portable Grills even further by color. We would only need to click the “+” icon, and select the subdivisions you want.

Before you finish, it’s very important to exclude the “All Products” product group from these subdivisions. Otherwise, you will still target all products. To do so, select the Product Group or subdivision you want to exclude, and click on “Exclude“.
You’re all done!
How To Improve Your Product Feeds
Now that you’ve created and launched your campaign, it’s where the hard work starts.
As we’ve mentioned before, your product feed is the most important element in your Google Shopping Ads campaign. As such, it will need regular maintenance to ensure that your ads are matched to the best search terms available.
So how can you improve your product feeds to ensure the best possible results?
1. Optimize Your Product Titles
Product titles are hands down the attribute that can have the most impact on your results, when well optimized.

You see, Google uses the information in the product feed to match a product to a user’s search query. The title is the most relevant attribute that Google will look for to determine which search terms the ad should show.
For instance, consider this same product, with two different titles.
- “Adidas UltraBoost Cloud White Size 7 Men’s Running Shoes“
- “Adidas UltraBoost Cloud White Size 7”
The first one is much more likely to show ads for the search term “Men’s Running Shoes” than the latter. Use this information well to make sure your ads show for the search terms you want.
Here are a few considerations to write great product titles.
- Write product titles with no more than 70 characters.
- Keep your target keyword as close to the beginning of your product title as possible.
- Don’t keyword stuff. Google doesn’t like it.
- Make the title as descriptive as possible. Includes, sizes, colors, weight, or materials, in order for the customer to know as much as possible about the product.
2. Optimize Your Product Descriptions
After your product titles, descriptions are arguably the second most important attribute in your product feeds. The product description is the text that appears under your product title, and it’s where you can add more information about your product that doesn’t fit in the title.
- Try to keep descriptions under the 1,000 character limit.
- Include the most relevant attributes in the description, such as the size, weight, color, or materials.
- Include closely related keywords.
3. Use Custom Labels
Google Shopping custom labels are one of the most advanced and powerful features you can leverage in your product feeds. In short, you can use custom labels to further subdivide products in your campaigns using values of your choosing.
For instance, one of the most common custom labels we use is the “Top Sellers” label. We’ll use this label to exclusively advertise our top-selling products and bid lower on low sellers. There are 5 custom label slots you can use, and each custom label can contain multiple different values.
In the scenario above, we could have our “custom_label_1” contain the values of:
- Top sellers
- Mid sellers
- Low sellers
We could then bid differently for each one of these subdivisions in our Google Shopping campaigns.
Now, the easiest method to add custom labels into your feed is to use a “Supplemental Feed“. In the “Feeds” tab in your Google Merchant Center account, under “Supplemental Feeds“, click on the “+” icon to create a new product feed.

Then, in the first column of your supplemental feed, add the product IDs of the products you want to add custom labels. In the next column, add the custom label attributes you want, as in the image above.
You can read more about custom labels at Google’s official documentation.
Bonus: Google Merchant Center Rules
One of the most underrated features within the Google Merchant Center is the “Feed Rules” tab.
With these feed rules, you’re able to edit and customize your product attributes with the assistance of “if > then“ rules. In other words, you can edit your product titles, descriptions, and even custom labels without supplemental feeds or external tools.
To access this tab, head over to your product feed tab and, in the main ribbon, click on “Feed Rules“.
Once in the tab, click on the “+” icon.

Then, click on the attribute you want to edit and select the “Set to” option to edit the attributes you want to change.

For example, you could use one of these rules to append the “size” attribute to the end of your product title. There are hundreds of other alternatives to using these rules, and you can find some examples in Google’s official custom rules documentation.
Closing Thoughts
In this Google Shopping Ads guide, we’ve covered everything that’s needed to set up a successful campaign.
However, getting good results with these campaigns will depend a lot on your ability to properly optimize and refine your product feed, so you can better target your ads, and reach better customers.
Furthermore, a well-planned structure will ensure that you can bid efficiently on your best products, and avoid wasted ad spend on poor performers.
Finally, it’s OK to feel a little overwhelmed with all this information. It takes some time and experience to master Google Shopping Ads campaign, but it is well worth the effort.
If you need a hand with product feeds, campaign structures, or anything else, drop us a comment in the box below and let’s talk!

