The Facebook Pixel is an integral element to the success of your Facebook campaigns.
With it, you can measure the effectiveness of your advertising efforts and understand the actions people take on your website, as a result of your Facebook Ads.
However, the greatest advantage to the Facebook Pixel isn’t the fact that it allows you to measure your goals. With some basic knowledge of how it works, it can also help you massively improve your targeting capabilities.
To be more precise, it is crucial you know your way around two of its most prominent features.
- Events
- Custom Conversions
By leveraging these features, you will not only be able to precisely measure your goals and their respective values but unlock a whole new set of features which will take your campaigns to a whole new level.
- Build custom audiences
- Track conversions
- Measure ROAS
- Optimize campaigns
- And much more!
However, these features can become quite technical for beginners, and often scare off the less technical-savvy of us.
With this said, this post will contain some basic programming jargon but rest assured – even non-developers (like me) can understand it.
So, don’t be frightened at the first glimpse of code. By the end of this post, you should be able to understand how to properly track conversions via pixel events, and a lot more.
Let’s get to it.
How it Works
You’ve probably heard the lengthy tale of the ‘code that you place on your website that helps you track conversions from Facebook Ads…’.
It goes on, and on, and on. You know the rest.

Now, while the explanation is technically correct, it isn’t really of much help to us ‘less-technical’ marketers out there. It doesn’t really explain how it works, does it?
So, how does Facebook know when a conversion occurred on your website?
Before we answer that question, let’s take a quick look at the pixel’s base code.

For Facebook to accurately report on conversions it will first require a little assistance to understand… well, what a conversion is.
To do so, the code starts by ‘…downloading a library of functions which you can later use for conversion tracking’. (quoted from Facebook’s official documentation here)
In other words, it establishes a bridge for communication between your page and Facebook. The block of code responsible for this is highlighted in yellow in the image above.
The next part is where the magic happens.
First, it will figure out to which account it needs to send the information to. It does so by accessing the pixel ID – highlighted in green.
Lastly, it will load the pageview track call – highlighted in blue.
Essentially, this track call will trigger a pageview event, letting Facebook know someone has visited a page.
Not too complicated, right?
So how can we use this knowledge to measure our conversions?
Tracking Conversions
There are three ways to measure conversions using the Facebook Pixel:
- Standard Events;
- Custom Events;
- Custom Conversions.
Each of these methods has its own advantages, and disadvantages. We will go over the three of them and discuss each thoroughly.
Note that each of these methods requires the pixel’s base code to be implemented on all pages of your website.
If you do not have your pixel installed, I recommend you go ahead and install it before proceeding.
If you don’t know how to do this, you can read this guide on how to install the Facebook pixel.
Ready?
Standard Events
Other than the pageview event, there are as much as 17 additional standard events that you can use to track user actions.
- AddPaymentInfo
- AddToCart
- AddToWishList
- CompleteRegistration
- Purchase
- Lead
- Search
- And more!
You can access all the standard events in Facebook’s developer documentation here.
According to Facebook’s official documentation, standard events are ‘(…) visitor actions that we have defined and that you report by calling a pixel function.’
With this knowledge, we would only need to edit the code and include one of the additional events that matches our desired user action.
Let’s say you wanted to use the purchase event to measure when someone has bought something on your website. This is how the code would look.
<!-- Facebook Pixel Code -->
<script>
  !function(f,b,e,v,n,t,s)
  {if(f.fbq)return;n=f.fbq=function(){n.callMethod?
  n.callMethod.apply(n,arguments):n.queue.push(arguments)};
  if(!f._fbq)f._fbq=n;n.push=n;n.loaded=!0;n.version='2.0';
  n.queue=[];t=b.createElement(e);t.async=!0;
  t.src=v;s=b.getElementsByTagName(e)[0];
  s.parentNode.insertBefore(t,s)}(window, document,'script',
  'https://connect.facebook.net/en_US/fbevents.js');
  fbq('init', 'your-pixel-id-goes-here');
  fbq('track', 'PageView');
  fbq('track', 'Purchase');
</script>
<noscript>
  <img height="1" width="1" style="display:none"
       src="https://www.facebook.com/tr?id=your-pixel-id-goes-here&ev=PageView&noscript=1"/>
</noscript>
<!-- End Facebook Pixel Code -->
In this case, two events would trigger
- Pageview
- Purchase
Note that you would only load the purchase track call in the thank-you page after a product has been purchased.
In other words, you only need to make sure that the purchase event is triggered when a purchase happens.
For example, you could do so by adding the purchase track call script to your thank-you page the user sees after completing a purchase.
Otherwise, you can also load the code on a button click, or any other user action you wish. Just add the script with the adequate event to the corresponding user action.
<body>
  ...
  <script>
    fbq('track', 'Purchase');
  </script>
  ...
</body>
Once the library has been loaded – code in yellow -, you are not required to add the entire script again. You can load the track calls whenever necessary.
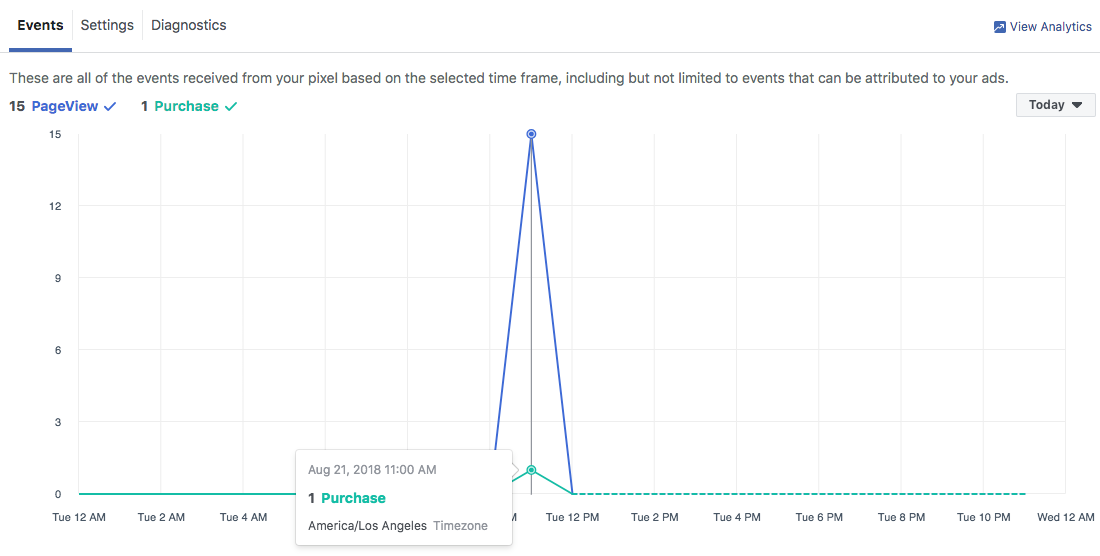
As soon as Facebook detects this event, it will report on it within the Facebook Analytics’ event manager section.
Custom Events
The second option is to use custom events.
Custom events differ from standard events in the way that these are not included in Facebook’s official documentation – which is inconvenient as it limits some of its features.
Essentially, to use custom events, you only need to replace the name of the event with… anything you want!
<body>
  ...
  <script>
    fbq('track', 'YOUREVENTNAME');
  </script>
  ...
</body>
But why would I use an event other than the ones provided by Facebook?
Quite often, you will find that the default standard events are not enough to fit your conversion goals, or they don’t really match the user action you wish to track.
For instance, say you’re in the insurance industry, you might want to trigger an event every time someone completes a life insurance simulation.
In this case, you could name your event life-insurance-simulation.
<script>

    fbq('track', 'life-insurance-simulation');

  </script>
However, as mentioned earlier, there are some disadvantages to custom events.
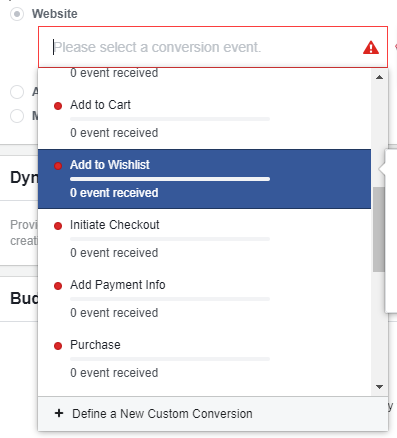
For instance, if you’re setting up a conversion campaign, you will not be able to select this event from the dropdown event list, as it will not be recognized by Facebook.
To go around this issue you will need to create a custom conversion – more on this in a minute.
Afterwards, it will be available for you to use just like any regular custom conversion.
Note that custom events should only be used when standard events alone are not enough to measure your goals.
But what if we want to measure how profitable our ads are?
Event Parameters
Both standard and custom events support parameter objects which allow you to include detailed information about the event.
You can consult the available object properties you can add to each event here.
With this extremely powerful feature, you can pass information to Facebook such as how many products were added to the basket, what their price was, or their product ID.
To make it easier for marketers to use this feature without the assistance of a developer, Facebook added the option to enable event parameters in the ‘Install Pixel Code’ window.
With the assistance of a developer, however, you can even take it a step further and track dynamic event values with the use of variables.
Custom Conversions
Moving on to the end of our list, and often the beginner’s choice for conversion tracking, comes the custom conversion method.
The biggest benefit of this method is that it does not require any additional changes to the code. This often comes in handy when you do not have access to your page’s code, or your client’s website.
So how does it work?
As we discussed earlier, each time a browser loads one of your pages containing the pixel, an event will be triggered signaling Facebook that a user has interacted with your website – whether that is a page view, or any other user action.
With this information, you can create a custom conversion by specifying the conditions under which your conversion will be triggered, letting Facebook know that a conversion just occurred.
You require one out of two elements to create a custom conversion.
- A page URL;
- An event.
In a simple manner, you only need to tell Facebook which URL, or event, corresponds to a conversion.
Here’s how you can set up your first custom conversion.
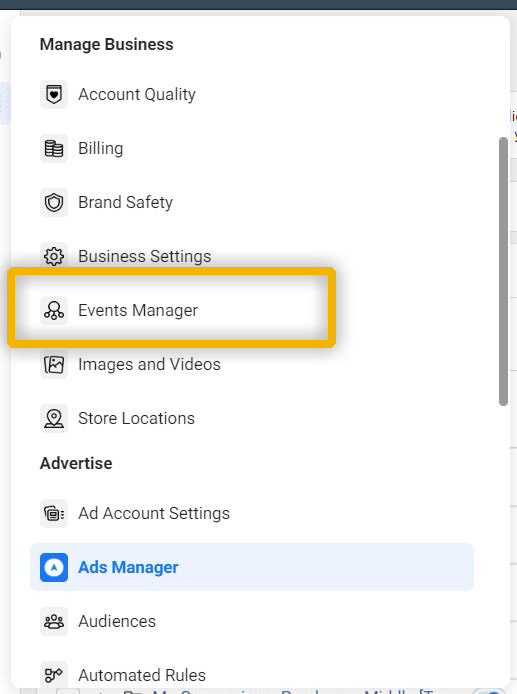
- Find the ‘Events Manager’ tab under ‘Measure & Report’ in the Ads Manager interface.
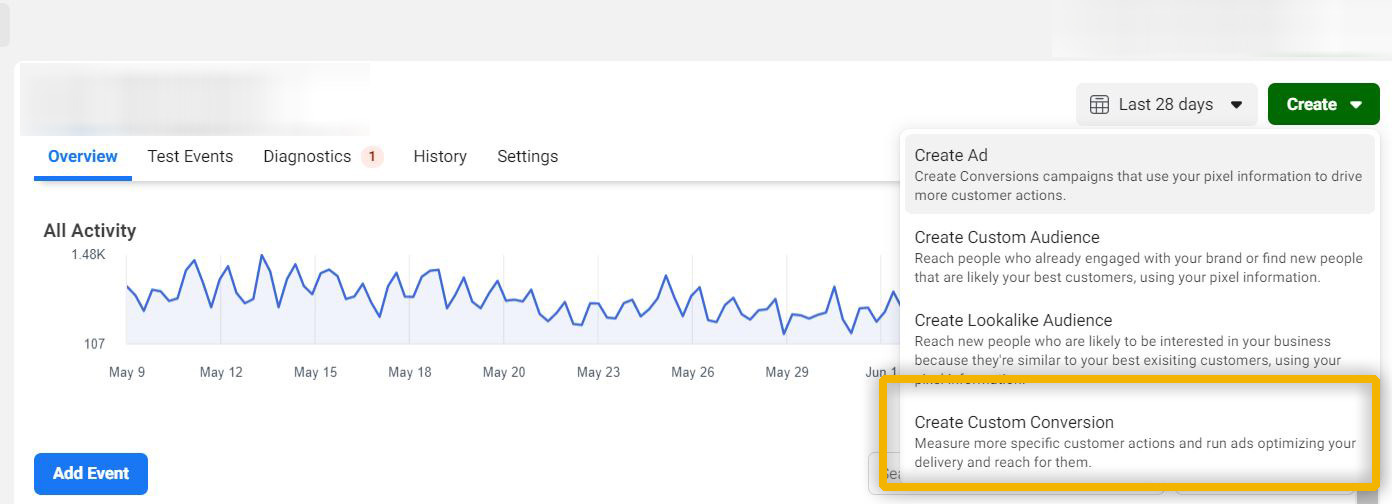
- Once there, click on the green ‘Create’ button on the top-right, and then ‘Create Custom Conversion’.
- Set the parameters that will define this custom conversion.
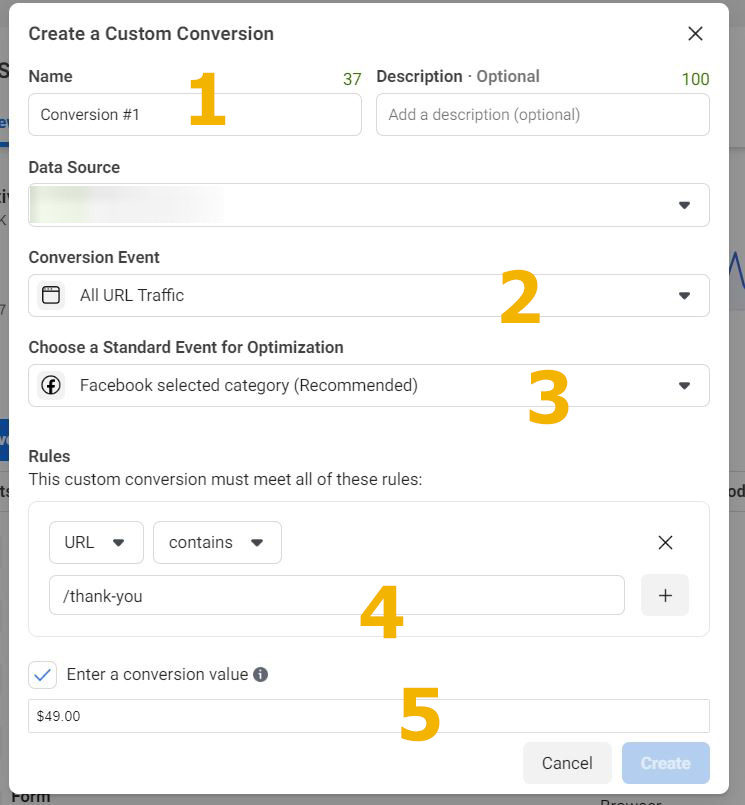
- The first one is the conversion name. You can call the conversion anything you want, but I recommend you give it a clear name that reflects the conversion accurately – such as Form Submission or eBook Download.
- Next, you will specify the conversion event that will trigger your custom conversion. You can choose to fire your custom conversion on a specific URL, or when a specific event occurs.
- The next step is to add a category for this conversion. If you’re triggering your custom conversion based on a standard event, you can skip this step. Otherwise, you’ll need to specify which standard events best matches your custom conversion so Facebook can optimize your ad delivery better. This is an important step, so do not skip it.
- Next, if you chose to trigger your custom conversion based on URL rules, you’ll need to specify which URL actually triggers the conversion. You can opt to add a partial URL using the ‘contains’ option or add the full URL of the thank-you page. The latter will only fire when the entire URL exactly matches.
- Lastly, the purchase value is self-explanatory – and option. If it’s a product purchase, you define the product price and write it down. It will help you figure out which campaigns, ad sets, or ads are the most profitable.
Once you’re done you can then consult your results in the Ads Manager by accessing the custom column fields and searching for your conversion, under the name you’ve given it in the previous steps.

Which Option Should You Be Using?
With all that said, there are multiple reasons as to why you should be using standard events opposed to the other options.
Let’s imagine a scenario where a customer reaches your website and, before purchasing one of your products, takes the following steps.
- Browses multiple products;
- Adds products to cart;
- Initiates checkout;
- Adds payment information;
- Purchases your product;
- Subscribes to your newsletter in the thank-you page.
If you were to use custom conversions without the assistance of any type of event, your only option would be to define the conversion rule using the thank-you page URL.
But what about all the other actions?
Unless you were passing this information with event parameters, you wouldn’t even be able to tell how many items were purchased, the total value, or even which items were purchased.
So which option would you rather use?
Bonus: Facebook Pixel Helper
I highly recommend you install the Facebook Pixel Helper chrome extension so you can see how events work.
Once you install the extension head over to my About Us page and open the extension in the top right corner of your browser. You will see a standard pageview event and a custom event named about.
You can use this extension in any website and figure out how marketers are keeping track of their website. Cool, huh?
Closing Thoughts
Now that we’ve reached the end this rather extensive post, let’s recap on some important notes.
| Standard Events | Custom Events | Custom conversions |
| Created by adding to the Facebook pixel base code. | Created by adding to the Facebook pixel base code. | No extra code required. Created in Ads Manager using URL and event rules. |
| Unlimited number of conversion events. | Limited to 40 custom events, unlimited conversion events. | Limited to 20 custom conversions per account. |
| Customized with parameters. | Customized with parameters. | Customized with granular URL rules. |
| Aggregated reporting. | Aggregated reporting. | Separate reporting. |
| Compatible with dynamic product ads. | Not compatible with dynamic product ads. | Not compatible with dynamic product ads. |
It is rather clear by now that standard events are the most beneficial option. However, this option does come with some rather technical nuances that might not be easily accessible to everyone.
In any case, with all the options available, it is only up to you to ensure you’re keeping track of all your goals in the best way possible.
To finish, if you’re serious about using standard events, I recommend you get familiar with Google Tag Manager – if you’re not, already. I have written a post on how to install the Facebook pixel using Google Tag Manager which you can read to get started.
I hope this post has been helpful to you. If you have any question, or need a hand with these events, drop a comment in the box below and let’s talk!

